Processing
ORGANOID coats carefully selected substrates with genuine natural materials. In a gentle process, the decors are applied to the material and customised to the respective requirements. This enables reliable performance, a high degree of design freedom and use in various applications, such as on walls, ceilings, wood, glass and many more.
Processing details at a glance
Bitte wähle deine Anwendung und das dazugehörige Trägermaterial für eine Detailsansicht
Flexi on wood, wood composite and furniture
- Bring the natural surface to room temperature before unpacking.
- The ORGANOID products on the laminating paper or veneer reinforcement fleece can be processed like HPL with the usual machinery used by carpenters.
- During the pressing process, a release paper should be used to protect the pressing plate and the pressing temperature should not exceed 60°C in order to protect the positive properties of the natural fibres.
- We recommend a white glue for processing in a veneer press.
- Observe guide values:
- Pressing pressure: approx. 1 kg/cm²
- Glue application: approx. 100 g/m²
- Pressing time: approx. 15 min
- Check and visually inspect the membranes for deviations and/or defects before processing and, if necessary, process them in an overturned manner.
- Preliminary tests/sample tests
- Check the sheets for deviations and/or defects BEFORE processing
- Cut to the desired size with a cutter knife and join the edges using the double seam cutting method
- Apply adhesive (e.g. white glue) evenly and without gaps to the wood-based material and not to the fleece. Adjust the amount of glue according to the substrate material, as the fleece absorbs moisture and this can lead to glue bleed-through. A pre-test is always recommended when using our products for the first time
- Apply adhesive in longitudinal and transverse direction using a glue roller
- Place the surface on the workpiece and be sure to cover it with the enclosed release paper so as not to damage the natural surface
- Do not exceed a pressing temperature of 60°C
- Remove the finished workpiece from the open press as quickly as possible and allow to cool evenly
- Cut off excess material or bend around the edge.
- Final work: Clean the surface with a fine cloth or clean brush and remove excess natural fibres.
- In general, most natural surfaces have very little effect on warping due to their low thickness.
- For sensitive applications, we are happy to offer uncoated (blank) webs of the laminating paper or the appropriate backing for the material used as a backing if required.
- Store the product in closed, dry rooms at normal temperatures (approx. 20°C, 30-60% relative humidity) protected from light.
- Recommendation for storage:
- Roll goods: hanging storage system (e.g. paternoster)
- Single decks: horizontal position (e.g. drawer system)
- Any deviations and/or defects in the goods must be reported to ORGANOID immediately in writing. Please check whether the delivery has any deviations and/or defects before installation.
- Natural surfaces from ORGANOID consist of natural plant fibres, which is why individual products of the same type may differ slightly in colour, smell or fibre composition.
- Dimensional deviations of up to +/- 2% are technically unavoidable with these natural products. Minor deviations in the area of these biological characteristics therefore do not constitute defects and do not provide a basis for warranty claims.
The complete processing instructions are available for download here:
Adhesive film on visible surfaces, wood, wall & ceiling
- The strong self-adhesive film is suitable for direct bonding to smooth and rough surfaces, e.g. plasterboard, concrete, metals, glass, wooden panels and other materials.
- The substrate must be in good condition, dry, clean and dust-free.
- Check and visually inspect the sheets for deviations and/or defects before processing and, if necessary, apply the adhesive in an upturned position.
- Roll out the material on a flat surface and leave flat under normal acclimatisation conditions (approx. 20°C and 50-65 rH% for 12 hours). Individual decks can be stacked.
- Test adhesion and substrate/adhesive compatibility before use
- The dry application method is recommended
- Measure the area to be covered exactly & cut the material to size with 2 cm excess on each side (edge tolerance of +/- 5 mm)
- Protect neighbouring surfaces from the strong self-adhesive film with masking tape
- Tip: the material can be cut into the desired shapes using a plotter or laser
- The material can be bonded to the substrate in various ways. Depending on surface size, material size or to optimise waste. Both vertical and horizontal applications are possible. Tip: Processing works best with a team of two people.
- Position the material on the surface
- Fix the material to the substrate with masking tape
- Detach the first 10-20cm of the yellow liner and fold it back
- Use a rubber roller to press the material onto the surface in a straight line. Apply sufficient pressure so that the adhesive film adheres well. Tip: Stick precisely – With this strong industrial adhesive film, readjustment is not possible or only possible with difficulty.
- Gradually peel off the liner with both hands & press the material down firmly with a rubber roller
- Once the material has been applied to the surface, carefully remove the masking tape
- Press all edges carefully and firmly with a rubber roller or a soft squeegee (glass, corners)
- Remove excess material with a cutter knife & ruler
- Double seam cut and overlap: Further strips must be applied with a double seam cut with an overlap of approx. 2 cm (edge tolerance of +/- 5 mm)
Tip: Stick a strip of masking tape with low adhesion vertically onto the edge of the already applied surface for orientation and to protect the lower sheet. Make sure that the strips run parallel to each other. Use a cutting ruler to cut through both strips at the same time and peel off the edge strips so that the strips lie together seam to seam. Press down the seam area - Applications on inside and outside 90° corners are possible, but material may peel off in some cases. The inclination of the film must therefore be checked in advance
- Application to glass: Applying the strips to glass requires additional attention. The adhesion of the adhesive tape to the smooth surface of glass is very strong, making repositioning impossible. Therefore, take special care to ensure that the film is aligned and in the correct position. Place the strips directly next to each other (butt joint). Observe the edge tolerance of +/- 5mm
- Final work: Clean the surface with a fine cloth or clean brush and remove excess natural fibres.
- Soft brush
- Cutter with sharp blades and cutting ruler
- Dry anti-slip gloves
- Marker pen for positioning
- Masking tape with low adhesion
- Soft rubber roller
- Felt squeegee
- Lint-free cloth for cleaning
The self-adhesive film is a permanent adhesive with high adhesive strength, which ensures good adhesion to a variety of smooth and textured surfaces. Clean and damage-free removal from surfaces is not to be expected. It is recommended to test the adhesion and removal on the substrate in advance.
Hints & tips for removing the adhesive film:
- Remove the film slowly
- Start to peel off the film firmly at the top – at an angle of 120° to 180° from the wall
- Do not use chemicals
- Low heat (30°C – 40°C) can be used on a suitable substrate – not suitable for plasterboard or windows, for example
- Blade scrapers can make honing easier
- Remove adhesive residue and clean the surface
- Store the product in closed, dry rooms at normal temperatures (approx. 20°C, 30-60% relative humidity) protected from light.
- Recommendation for storage:
- Roll goods: hanging storage system (e.g. paternoster)
- Single decks: horizontal position (e.g. drawer system)
- Any deviations and/or defects in the goods must be reported to ORGANOID immediately in writing. Please check whether the delivery has any deviations and/or defects before installation.
- Natural surfaces from ORGANOID consist of natural plant fibres, which is why individual products of the same type may differ slightly in colour, smell or fibre composition.
- Dimensional deviations of up to +/- 2% are technically unavoidable with these natural products. Minor deviations in the area of these biological characteristics therefore do not constitute defects and do not provide a basis for warranty claims.
The complete processing instructions are available for download here:
Gold paper on wood, wood composite and furniture
- Bring the natural surface to room temperature before unpacking.
- ORGANOID products on flax fleece can be processed with the usual machinery used by carpenters.
- During the pressing process, a release paper should be used to protect the pressing plate and the pressing temperature should not exceed 60°C in order to protect the positive properties of the natural fibres.
- We recommend a white glue for processing in a veneer press.
- Observe guide values:
- Pressing pressure: approx. 1 kg/cm²
- Glue application: approx. 100 g/m²
- Pressing time: approx. 15 min
- Check and visually inspect the membranes for deviations and/or defects before processing and, if necessary, process them in an overturned manner.
- Preliminary tests/sample tests
- Check the sheets for deviations and/or defects BEFORE processing
- Cut to the desired size with a cutter knife and join the edges using the double seam cutting method
- Apply adhesive (e.g. white glue) evenly and without gaps to the wood-based material and not to the fleece. Adjust the amount of glue according to the substrate material, as the fleece absorbs moisture and this can lead to glue bleed-through. A pre-test is always recommended when using our products for the first time
- Apply adhesive in longitudinal and transverse direction using a glue roller
- Place the surface on the workpiece and be sure to cover it with the enclosed release paper so as not to damage the natural surface
- Do not exceed a pressing temperature of 60°C
- Remove the finished workpiece from the open press as quickly as possible and allow to cool evenly
- Cut off excess material or bend around the edge.
- Final work: Clean the surface with a fine cloth or clean brush and remove excess natural fibres.
- In general, most natural surfaces have very little effect on warping due to their low thickness.
- For sensitive applications, we are happy to offer uncoated (blank) webs of the laminating paper or the appropriate backing for the material used as a backing if required.
- Store the product in closed, dry rooms at normal temperatures (approx. 20°C, 30-60% relative humidity) protected from light.
- Recommendation for storage:
- Roll goods: hanging storage system (e.g. paternoster)
- Single decks: horizontal position (e.g. drawer system)
- Any deviations and/or defects in the goods must be reported to ORGANOID immediately in writing. Please check whether the delivery has any deviations and/or defects before installation.
- Natural surfaces from ORGANOID consist of natural plant fibres, which is why individual products of the same type may differ slightly in colour, smell or fibre composition.
- Dimensional deviations of up to +/- 2% are technically unavoidable with these natural products. Minor deviations in the area of these biological characteristics therefore do not constitute defects and do not provide a basis for warranty claims.
The complete processing instructions are available for download here:
Flax on wood, wood composite and furniture
- Bring the natural surface to room temperature before unpacking.
- ORGANOID products on flax fleece can be processed with the usual machinery used by joiners.
- During the pressing process, a release paper should be used to protect the pressing plate and the pressing temperature should not exceed 60°C in order to protect the positive properties of the natural fibres.
- We recommend a white glue for processing in a veneer press.
- Observe guide values:
- Pressing pressure: approx. 1 kg/cm²
- Glue application: approx. 100 g/m²
- Pressing time: approx. 15 min
- Check and visually inspect the sheets for deviations and/or defects before processing and, if necessary, process them in an upended manner.
- Preliminary tests/sample tests
- Check the sheets for deviations and/or defects BEFORE processing
- Cut to the desired size with a cutter knife and join the edges using the double seam cutting method
- Apply adhesive (e.g. white glue) evenly and without gaps to the wood-based material and not to the fleece. Adjust the amount of glue according to the substrate material, as the fleece absorbs moisture and this can lead to glue bleed-through. In any case, a pre-test is recommended when using our products for the first time
- Apply adhesive in longitudinal and transverse direction using a glue roller
- Place the surface on the workpiece and be sure to cover it with the enclosed release paper so as not to damage the natural surface
- Do not exceed a pressing temperature of 60°C
- Remove the finished workpiece from the open press as quickly as possible and allow to cool evenly
- Cut off excess material or bend around the edge.
- Final work: Clean the surface with a fine cloth or clean brush and remove excess natural fibres.
- In general, most natural surfaces have very little effect on warping due to their low thickness.
- For sensitive applications, we are happy to offer uncoated (blank) webs of the laminating paper or the appropriate backing for the material used as a backing if required.
- Store the product in closed, dry rooms at normal temperatures (approx. 20°C, 30-60% relative humidity) protected from light.
- Recommendation for storage:
- Roll goods: hanging storage system (e.g. paternoster)
- Single decks: horizontal position (e.g. drawer system)
- Any deviations and/or defects in the goods must be reported to ORGANOID immediately in writing. Please check whether the delivery has any deviations and/or defects before installation.
- Natural surfaces from ORGANOID consist of natural plant fibres, which is why individual products of the same type may differ slightly in colour, smell or fibre composition.
- Dimensional deviations of up to +/- 2% are technically unavoidable with these natural products. Minor deviations in the area of these biological characteristics therefore do not constitute defects and do not provide a basis for warranty claims.
The complete processing instructions are available for download here:
Gold paper on wall & ceiling
- The substrate must be dry, stable, evenly absorbent, clean, dust-free, smooth, sufficiently even for wallpapering and of a neutral colour.
- Remove stains or colour differences on the wall with a suitable pigmented wallpaper primer to prevent them from shining through.
- Cracks, holes and unevenness must be repaired with suitable measures before wallpapering.
- Allow freshly plastered surfaces to dry thoroughly.
- Set highly absorbent surfaces with a suitable unpigmented or water-based primer.
- The substrate must still be evenly absorbent after the primer coat.
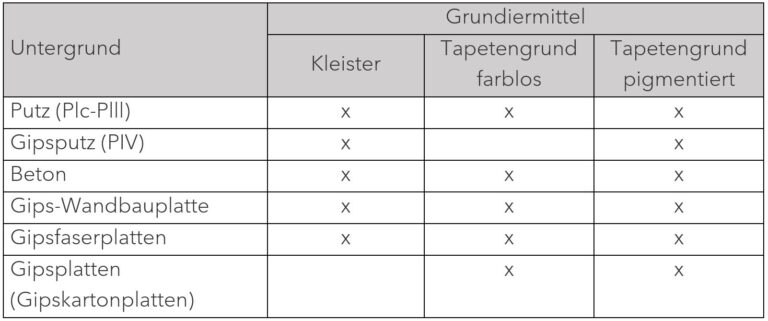
- Primer:
- Check and visually inspect the membranes BEFORE processing for deviations and/or defects and, if necessary, apply the adhesive in an upturned position.
- Preliminary tests/sample tests
- Start at the window or light source
- Ensure room temperature +18 to +25C, humidity 30 to 60% and draught
- Bring the natural surface to room temperature before unpacking.
- The golden paper needs time to soften, otherwise it will wrinkle on the wall and only partially smooth out again.
- Apply a generous amount of clear, clean water to the back of the sheet using a sponge – the soaking time is approx. 7-10 minutes.
- During the soaking time, the wallpaper backing must be kept permanently moist.

- Mark the first track vertically.
- Apply a thick and even layer of paste to the surface to be wallpapered using a short pile roller and a brush in the corners.
- Insert the soaked golden paper into the adhesive bed starting from the top.
- Press on the sheets with a rubber roller without bubbles or creases.
- Cut off any excess, e.g. on the ceiling or floor, using a wallpaper ruler and cutter knife.

- Apply the adhesive for the second sheet to be laid.
- Each strip overlaps the previous one by approx. 2cm.
- Observe the edge tolerance of 1-2 mm.
- Use a wallpapering rail or a long ruler to cut through both strips at the same time so that they lie together on the seam.
- Press the rail or ruler down firmly and use a sharp blade to prevent the soaked strips from tearing when cutting.
- Then press on with a seam roller.
- Alternative: Cut the sheets exactly to the side and glue them together.

- Due to the scattered look, there is no need for a repeat when gluing.
- Cutter knife and wallpapering scissors
- Short pile roller & brush (for the corners)
- Line laser or plumb bob
- Rubber roller & seam roller
- Wallpaper ruler
- Clean lint-free cloth & fine clean brush
- We recommend Glutolin ECC extra clear for applying ORGANOID wallpapers.
- The manufacturer’s processing instructions must be observed.
- The adhesive can be purchased directly from ORGANOID (5kg bucket). (Shoplink)
- Dab off paste stains on the surface with a dry cloth (light products with low material application) or a damp cloth (products with a high fibre and binder content).
- When drying, it is important to keep the windows closed and not to heat excessively. The optimum temperature is 18 to 22 °C without draughts.
- After the wallpaper has dried, remove any detached natural fibres with a dry cloth or soft brush. The possible detachment of the fibres is due to the absorption of the adhesive moisture and is a natural behaviour.
- Peel off the wallpaper and remove any residue with a spatula or scraper.
- Tip: Cut the wallpaper into strips beforehand to make it easier to remove (pre-treat with water and wallpaper remover if necessary).
- Store the product in closed, dry rooms at normal temperatures (approx. 20°C, 30-60% relative humidity) protected from light.
- Roll goods: hanging storage system (e.g. paternoster)
- Single decks: horizontal position (e.g. drawer system)
- Any deviations and/or defects in the goods must be reported to ORGANOID immediately in writing. Please check whether the delivery has any deviations and/or defects before installation.
- Natural surfaces from ORGANOID consist of natural plant fibres, which is why individual products of the same type may differ slightly in colour, smell or fibre composition.
- Dimensional deviations of up to +/- 2% are technically unavoidable with these natural products. Minor deviations in the area of these biological characteristics therefore do not constitute defects and do not provide a basis for warranty claims.
The complete processing instructions are available for download here:
Flexi on wall & ceiling
- The substrate must be dry, stable, evenly absorbent, clean, dust-free, smooth, sufficiently even for wallpapering and of a neutral colour.
- Remove stains or colour differences on the wall with a suitable pigmented wallpaper primer to prevent them from shining through.
- Cracks, holes and unevenness must be repaired with suitable measures before wallpapering.
- Allow freshly plastered surfaces to dry thoroughly.
- Set highly absorbent surfaces with a suitable unpigmented or water-based primer.
- The substrate must still be evenly absorbent after the primer coat.
- Primer:
- Check and visually inspect the membranes BEFORE processing for deviations and/or defects and, if necessary, apply the adhesive in an inverted position.
- Preliminary tests/sample tests
- Start at the window or light source
- Ensure room temperature +18 to +25C, humidity 30 to 60% and draught
- Bring the natural surface to room temperature before unpacking.
- Mark the first track vertically.
- Apply a thick and even layer of paste to the surface to be wallpapered using a short pile roller and a brush in the corners.
- Keep fleece backing dry and clean.
- Insert the wallpaper into the adhesive bed without soaking time, starting from the top.
- Press on the sheets with a rubber roller without bubbles or creases.
- Cut off any excess, e.g. on the ceiling or floor, using a wallpaper ruler and cutter knife.
- Apply the adhesive for the second sheet to be laid.
- Each strip overlaps the previous one by approx. 2cm.
- Observe the edge tolerance of 1-2 mm.
- Use a wallpapering rail or a long ruler to cut through both strips at the same time so that they lie together on the seam.
- Then press on with a seam roller.
- Due to the scattered look, there is no need for a repeat when gluing.
- Cutter knife and wallpapering scissors
- Short pile roller & brush (for the corners)
- Line laser or plumb bob
- Rubber roller & seam roller
- Wallpaper ruler
- Clean lint-free cloth & fine clean brush
- We recommend Glutolin ECC extra clear for applying ORGANOID wallpapers.
- The manufacturer’s processing instructions must be observed.
- The adhesive can be purchased directly from ORGANOID (5kg bucket). (Shoplink)
- Dab off paste stains on the surface with a dry cloth (light products with low material application) or a damp cloth (products with a high fibre and binder content).
- When drying, it is important to keep the windows closed and not to heat excessively. The optimum temperature is 18 to 22 °C without draughts.
- After the wallpaper has dried, remove any detached natural fibres with a dry cloth or soft brush. The possible detachment of the fibres is due to the absorption of the adhesive moisture and is a natural behaviour.
- Peel off the wallpaper and remove any residue with a spatula or scraper.
- Tip: Cut the wallpaper into strips beforehand to make it easier to remove (pre-treat with water and wallpaper remover if necessary).
- Store the product in closed, dry rooms at normal temperatures (approx. 20°C, 30-60% relative humidity) protected from light.
- Roll goods: hanging storage system (e.g. paternoster)
- Single decks: horizontal position (e.g. drawer system)
- Any deviations and/or defects in the goods must be reported to ORGANOID immediately in writing. Please check whether the delivery has any deviations and/or defects before installation.
- Natural surfaces from ORGANOID consist of natural plant fibres, which is why individual products of the same type may differ slightly in colour, smell or fibre composition.
- Dimensional deviations of up to +/- 2% are technically unavoidable with these natural products. Minor deviations in the area of these biological characteristics therefore do not constitute defects and do not provide a basis for warranty claims.
COFFEE LEATHER on Flexi: Due to the product’s own residual moisture and the spores naturally contained in the coffee particles, this surface tends to form mycelia when stored in complete darkness. This white film is completely harmless and does not affect other products. The film can be easily removed with a soft brush or cloth. In addition, this effect only occurs during prolonged storage and can be easily cleaned. It has not yet been observed in the installed state.
The complete processing instructions are available for download here:
Flax fleece on wall and ceiling
- The substrate must be dry, stable, evenly absorbent, clean, dust-free, smooth, sufficiently even for wallpapering and of a neutral colour.
- Remove stains or colour differences on the wall with a suitable pigmented wallpaper primer to prevent them from shining through.
- Cracks, holes and unevenness must be repaired with suitable measures before wallpapering.
- Allow freshly plastered surfaces to dry thoroughly.
- Set highly absorbent surfaces with a suitable unpigmented or water-based primer.
- The substrate must still be evenly absorbent after the primer coat.
- Primer:
- Check and visually inspect the membranes BEFORE processing for deviations and/or defects and, if necessary, apply the adhesive in an inverted position.
- Preliminary tests/sample tests
- Start at the window or light source
- Ensure room temperature +18 to +25C, humidity 30 to 60% and draught
- Bring the natural surface to room temperature before unpacking.
- Mark the first track vertically.
- Apply a thick and even layer of paste to the surface to be wallpapered using a short pile roller and a brush in the corners.
- Keep fleece backing dry and clean.
- Insert the wallpaper into the adhesive bed without soaking time, starting from the top.
- Press on the sheets with a rubber roller without bubbles or creases.
- Cut off any excess, e.g. on the ceiling or floor, using a wallpaper ruler and cutter knife.
- Apply the adhesive for the second sheet to be laid.
- Each strip overlaps the previous one by approx. 2cm.
- Observe the edge tolerance of 1-2 mm.
- Use a wallpapering rail or a long ruler to cut through both strips at the same time so that they lie together on the seam.
- Then press on with a seam roller.
- Due to the scattered look, there is no need for a repeat when gluing.
- Cutter knife and wallpapering scissors
- Short pile roller & brush (for the corners)
- Line laser or plumb bob
- Rubber roller & seam roller
- Wallpaper ruler
- Clean lint-free cloth & fine clean brush
- We recommend Glutolin ECC extra clear for applying ORGANOID wallpapers.
- The manufacturer’s processing instructions must be observed.
- The adhesive can be purchased directly from ORGANOID (5kg bucket). (Shoplink)
- Dab off paste stains on the surface with a dry cloth (light products with low material application) or a damp cloth (products with a high fibre and binder content).
- When drying, it is important to keep the windows closed and not to heat excessively. The optimum temperature is 18 to 22 °C without draughts.
- After the wallpaper has dried, remove any detached natural fibres with a dry cloth or soft brush. The possible detachment of the fibres is due to the absorption of the adhesive moisture and is a natural behaviour.
- Peel off the wallpaper and remove any residue with a spatula or scraper.
- Tip: Cut the wallpaper into strips beforehand to make it easier to remove (pre-treat with water and wallpaper remover if necessary).
- Store the product in closed, dry rooms at normal temperatures (approx. 20°C, 30-60% relative humidity) protected from light.
- Roll goods: hanging storage system (e.g. paternoster)
- Single decks: horizontal position (e.g. drawer system)
- Any deviations and/or defects in the goods must be reported to ORGAOID immediately in writing. Please check whether the delivery has any deviations and/or defects before installation.
- Natural surfaces from ORGANOID consist of natural plant fibres, which is why individual products of the same type may differ slightly in colour, smell or fibre composition.
- Dimensional deviations of up to +/- 2% are technically unavoidable with these natural products. Minor deviations in the area of these biological characteristics therefore do not constitute defects and do not provide a basis for warranty claims.
The complete processing instructions are available for download here: